You know that craving for crispy chicken? The kind where you just want that golden, crunchy bite without standing over a messy pot of oil?
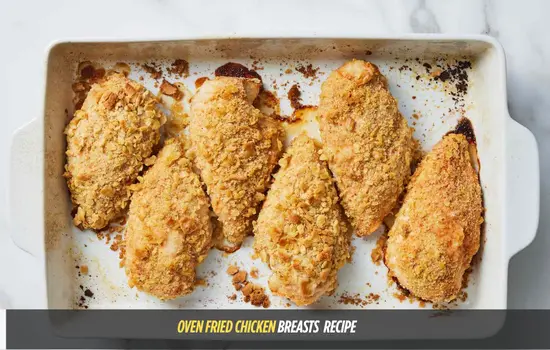
That’s why these Easy Oven Fried Chicken Breasts have become my go-to for weeknight dinners. This is the method I depend on for crispy oven-baked chicken. It’s far better than that pale, disappointing version we’ve all tried.
This recipe is a total game-changer. We’re discussing a crust that is crisp, a juicy interior, and no frying. The secret isn’t magic — it’s a hot baking sheet and a little olive oil in the breadcrumbs. Wait, scratch that — 425°F is the real hero here.
Contents
Why This Recipe Works (No Kidding)
- That hot pan trick: Put the breaded chicken on a preheated baking sheet. It instantly sears the bottom. This creates a barrier that prevents sogginess from even starting.
- Mix olive oil into the breadcrumbs, not just on top. This helps the panko fry and brown better in the oven’s dry heat. It’s like each crumb gets its own tiny sauna.
- Parmesan for crunch and color: Grated Parmesan adds savory depth. It caramelizes in a short time. This gives you a golden, craggy crust.
- No more dry chicken breasts! Pull them at 160°F and let carryover cooking finish the last 5 degrees. You’ll never struggle with a chalky, stringy piece again.
Tools You’ll Need (Keep It Simple)
You don’t need a fancy air fryer (though I’ll tell you how to use one later). Just grab these basics:
- Rimmed baking sheet (half-sheet size is perfect)
- Parchment paper (for easy cleanup — trust me on this)
- Meat thermometer (my absolute non-negotiable tool)
- Two shallow bowls or pie plates (for dredging)
- Rolling pin or meat mallet (or a heavy skillet if you’re me and have lost your mallet)
- Wire cooling rack (optional, but so nice for keeping the bottom crisp)
Ingredients for the Best Oven-Fried Chicken Breasts
Here’s what you will need. Nothing weird, I promise.
- 2 lbs. boneless, skinless chicken breasts – Look for ones that are similar in size. If one is a monster, butterfly it or pound it to ½-inch thickness
- 2 large eggs – These are the glue. Room temperature is more favorable, but I never remember to take them out ahead of time
- 1 cup breadcrumbs
- Panko is best for crunch, but Italian seasoned breadcrumbs also work well.
- Italian seasoned breadcrumbs are also a good choice.
- 1 cup breadcrumbs
- I often mix half-and-half.
- ¼ cup grated Parmesan cheese – The green can is fine, but freshly grated melts into the crust better
- 2 tbsp olive oil – This is key. Don’t skip it or try to spray oil on top later — mix it in.
- ½ tsp garlic powder
- ½ tsp paprika – Smoked paprika adds a little something special, but sweet works too
- ¼ tsp black pepper (plus more for seasoning the chicken)
- Salt – About ¾ tsp kosher salt in the breadcrumb mix, plus a pinch on the chicken.
(Reader tip: For a spicy version, add ¼ tsp cayenne or a pinch of red pepper flakes to the breadcrumbs. My husband douses his in hot sauce anyway, so I keep it mild.)
How to Make Crispy Oven-Fried Chicken Breasts (Step-by-Step)
The first time I tried this, I forgot to preheat the pan. The result? A sad, pale underside that peeled right off like a bandage. Lesson learned. So please — do not skip the hot pan step.
1. Preheat like your crust depends on it
Crank your oven to 425°F. Then place your empty baking sheet on the middle rack while it heats. Let it sit in there for a good 10-15 minutes after the oven beeps. You want that metal screaming hot.
2. Pound ‘me even
Pat the chicken dry with paper towels. If the breasts are uneven, cover them with plastic wrap and gently pound to an even ½-inch thickness. You’re not trying to obliterate them — just creating a uniform surface so they cook at the same rate. Season both sides with salt and pepper.
3. Set up your dredging station
In one shallow bowl, whisk the eggs until frothy. In a different bowl, combine the breadcrumbs and Parmesan. Add olive oil, garlic powder, paprika, and black pepper. Mix well. Use your fingers to rub the oil into the crumbs — it should feel like damp sand.
4. The hot pan dance (be careful!)
Carefully remove the hot baking sheet from the oven. Line it with parchment paper (the paper might curl a little from the heat; that’s fine). Give it a quick spritz with cooking spray.
5. Coat and place
Dip each chicken breast into the egg wash, letting the excess drip off. Then press firmly into the breadcrumb mixture. I mean firmly — really pack it on both sides. Place the coated chicken in the hot pan lined with parchment paper. Leave at least an inch of space between each piece. Overcrowding = steaming = sad, soft chicken.
6. Bake, flip, and listen for the sizzle
Slide the pan back into the oven. You should hear a faint sizzle as the chicken hits the hot metal — that’s the sound of success. Bake for 10 minutes. Then flip each piece carefully with a spatula. You’ll see the bottom is already golden and crispy. Beautiful, right?
Continue baking for another 8 to 12 minutes. An instant-read thermometer should show 160°F in the thickest part. The temperature will rise to 165°F as it rests.
7. The optional broiler boost
For that deep-fried, craggy, dark-golden crust? Turn on the broiler for the final 1-2 minutes. Do not walk away. I’ve burned a whole batch by answering a text. Just stand there and watch it bubble and brown.
8. Rest (this is not optional)
Let the chicken rest on a wire rack or a clean plate for 5 minutes. If you slice into it right away, all those beautiful juices will run out onto the cutting board. Patience, my friend.
What to Serve With Oven-Fried Chicken Breasts
Honestly? These are good enough to eat with your hands over the sink (no judgment). But for a real meal, I love them with:
- Creamy mashed potatoes and a pile of green beans
- A simple arugula salad with lemon vinaigrette. The peppery greens balance the richness.
- Roasted broccoli or Brussels sprouts
- Over a Caesar salad for a crunchy chicken salad situation
Storage & Freezing
Storing in the Fridge
Let the chicken cool completely (about 30 minutes). Place in an airtight container, but try to arrange them in a single layer. Stacking traps steams and softens the crust. They’ll keep for up to 4 days.
How to Reheat Without Ruining the Crust
The microwave will make them chewy and sad. Here’s what actually works:
- Oven (best method): Preheat to 375°F. Place chicken on a wire rack over a baking sheet. Heat for 8-12 minutes until hot and crisp.
- Air fryer: 350°F for 4-6 minutes. Even faster and crispier.
- Skillet: A nonstick pan over medium heat with a tiny splash of oil. Cover for 2 minutes, then uncover for 1-2 minutes to re-crisp the bottom.
Can you freeze them?
Yes! Freeze the cooked and cooled chicken on a parchment-lined baking sheet. Leave it for about 2 hours until solid. Then transfer to a freezer bag. They’ll keep for 2 months. Reheat from frozen at 375°F for 15-20 minutes — no need to thaw.
Crispy Oven Fried Chicken Breasts at Home
Crispy oven-fried chicken breasts at home. No fryer needed!
Ingredients
Instructions
Preheat your oven and pan
- Set your oven to 425°F. Place your empty baking sheet inside while it preheats. Let it sit there for at least 10 minutes after the oven beeps.
Prep the chicken
- Pat the chicken dry with paper towels. If the breasts are super thick, pound them to an even ½-inch thickness. Season both sides with salt and pepper.
Set up your dredging station
- In bowl one: whisk the eggs until frothy.
- In bowl two: mix breadcrumbs, Parmesan, olive oil, garlic powder, paprika, and pepper. Use your fingers to rub the oil into the crumbs.
Heat up that pan
- Carefully pull the hot baking sheet out of the oven. Line it with parchment paper and give it a quick spritz of cooking spray.
Coat the chicken
- Dip each breast into the egg wash, letting the excess drip off. Then press firmly into the breadcrumb mixture — really pack it on. Place onto the hot pan, leaving space between each piece.
Bake to perfection
- Bake for 10 minutes. Flip carefully. Bake for another 8-12 minutes, until a meat thermometer reads 160°F in the thickest part.
Optional crisping
- Want that deep-fried look? Broil for 1-2 minutes at the end. Watch it closely — I've burned a batch by walking away!
Rest (don't skip this!)
- Let the chicken rest for 5 minutes before slicing. The temperature will rise to 165°F and the juices will stay inside where they belong.
Nutrition Facts
Servings 4
- Amount Per Serving
- Calories 487kcal
- % Daily Value *
- Total Fat 18g28%
- Saturated Fat 4g20%
- Cholesterol 230mg77%
- Sodium 602mg26%
- Total Carbohydrate 21g8%
- Dietary Fiber 1g4%
- Sugars 2g
- Protein 56g113%
* Percent Daily Values are based on a 2,000 calorie diet. Your daily value may be higher or lower depending on your calorie needs.
Note
If you love these Chicken Breasts at Home, I would be so grateful if you leave a 5-star 🌟 rating in the recipe card below. I love reading your comments and feedback!
Stay posted on my latest cooking recipe through social media @Instagram, Pinterest, and Facebook. And also don’t forget to tag me when you try my recipes.
Pin this recipe to share with your friends and followers.

Frequently Asked Questions
Why is my coating falling off?
You probably didn't pat the chicken dry before dipping. Moisture is the enemy of adhesion. Also, press that breadcrumb mixture on firmly — don't be shy!
Can I make this gluten-free?
Absolutely. Use gluten-free panko or crushed gluten-free cereal. The method stays the same.
My chicken is browning too fast — help!
Your oven runs hot. Drop the temperature to 400°F next time and add a few minutes to the cook time.

You may also like...