I’ve made a lot of chicken tenders over the years. Some were amazing. Most were… fine. And a few were straight-up sad—soggy, greasy, or worse, the coating fell off the second I picked one up.
The first time I tried a panko chicken tenders recipe, I used regular breadcrumbs by accident. Didn’t think it mattered much. Oh, it mattered. The coating came out dense and heavy. Not that light, shattery crunch you want.
Contents
Why This Panko Chicken Tenders Recipe Works
- The baking soda velvet. Dust the raw tenders with baking soda for 15 minutes, rinse, and pat dry. This breaks down the proteins slightly—you get that almost “takeout” tender texture without any weird chemicals.
- Water, not milk. Most recipes use milk in the egg wash. But water keeps everything lighter. Milk adds fat that can weigh down the panko. Try it once, and you’ll see the difference.
- Wire rack for draining. Paper towels trap steam. Steam makes the bottom soggy. A high wire frame? Air circulates. Crispy all over. (I learned this after way too many limp-bottomed tenders.)
(Note from the kitchen: Your oil temp matters more than you think. 330-340°F is the zone. Any cooler and the tenders soak up grease. Any hotter and the panko burns before the chicken cooks through. I keep a clip-on thermometer in the pot at all times.)
What Are Panko Chicken Tenders?
Panko is a Japanese-style breadcrumb. It’s lighter, flakier, and crunchier than regular breadcrumbs. No comparison, really. Regular crumbs give you a dense, bready crust. Panko gives you that delicate, almost tempura-like shell.
Chicken tenders themselves come from a specific part of the bird. They are naturally more tender than the breast (hence the name). But if you cannot find them, you can totally slice chicken breasts into strips.
Tools You’ll Need
Nothing too wild. Most of this you probably already have.
- Cutting board & knife
- Dutch oven or heavy-bottom pot – cast iron holds heat best for frying
- High-heat thermometer – clip-on style is easiest. Don’t guess the temp.
- Spider ladle – for lifting tenders out without breaking the coating
- Metal tongs – long ones keep your hands safe
- Wire rack – must be elevated. If it sits flat, prop it up with small ramekins.
- Paper towels
- Platter – for raw breaded tenders before frying
- 2 plates – for the panko stations
- 1 wide bowl – for the egg wash
Ingredients for Panko Chicken Tenders
For the Chicken:
- 1.25 lbs chicken tenders (about 12 pieces) – or use chicken breasts sliced into 1-inch strips
For Tenderizing:
- 2 tsp baking soda – trust me on this
For the Coating:
- 2 cups panko breadcrumbs – don’t substitute regular breadcrumbs here. Just don’t.
- 2 large eggs
- 4 tbsp water – cold water works fine
For Frying & Finishing:
- High-heat oil – canola, vegetable, or avocado. Enough to fill your pot about 3 inches deep.
- Sea salt – for sprinkling right after frying
- Optional spices – garlic powder, smoked paprika, cayenne, black pepper
For Dipping (optional):
- BBQ sauce, ranch, honey mustard, sweet chili, whatever you like
How to Make Panko Chicken Tenders
1. Tenderize the chicken
Place chicken tenders in a bowl. Sprinkle with 1 teaspoon of baking soda per pound of chicken. Toss to coat. Let’s sit for exactly 15 minutes. Set a timer.
Why? The baking soda raises the pH on the surface of the meat, which prevents the proteins from tightening up too much when they hit the heat. Result? Incredibly tender, almost velvety chicken.
After 15 minutes, rinse thoroughly under cold water. Then pat completely dry with paper towels. Any leftover moisture will mess with your coating.
2. Heat the oil
Pour oil into your Dutch oven until it’s about 3 inches deep. Heat over medium until the thermometer reads 340°F. Not 320°F, not 360°F. 340°F is the sweet spot.
3. Set up your breading station
You need three stations:
- Plate 1: Panko breadcrumbs (first layer)
- Wide bowl: Whisk the 2 eggs and 4 tbsp water together until frothy
- Plate 2: More panko breadcrumbs (second layer)
Keep them in that order: panko → egg → panko.
4. Coat the tenders
Working one at a time: Dip a tender into the first panko plate. Press gently so crumbs stick. Then dip into the egg wash, letting the excess drip off. Finally, press into the second panko plate.
Press gently—you want the crumbs to adhere, not get crushed into dust. Set the breaded tender on a platter. Repeat with all pieces.
Here’s a mistake I made for years: crowding the platter. Leave space between the raw, breaded tenders, or they will stick together. Ask me how I know.
5. Fry in batches
Carefully place 4-5 tenders into the hot oil. Don’t overcrowd—the temperature will drop, and you’ll get greasy tenders.
Fry for 2 minutes on the first side. Listen for that aggressive sizzle. When the bottom is deep golden brown, flip with tongs. Fry another 2 minutes on the second side.
The panko should be golden—never dark brown. If it’s browning too fast, your oil is too hot. Turn the heat down a notch.
6. Drain the right way
Use your spider ladle to lift the tenders out of the oil. Transfer directly to an elevated wire rack.
If your rack sits flat on a baking sheet, prop it up with two small ramekins or folded foil. You need air moving underneath. Paper towels = soggy bottoms. Wire rack = crispy all over.
Pat off any visible oil with a paper towel—but don’t press hard or you’ll crush the panko.
7. Season immediately
While the tenders are still hot, sprinkle generously with sea salt. Add any other spices now—garlic powder, smoked paprika, cayenne. The residual heat helps the seasoning stick.
8. Rest (this matters)
Let the tenders rest for 5-7 minutes before serving. I know, waiting is hard. But this lets the juices redistribute inside the meat. Cut into one too early, and all that moisture runs out onto your plate.
What I Messed Up So You Don’t Have To
First attempt: Used regular breadcrumbs, thinking, “How different can they be?” Very different. The coating was heavy and felt greasy, not crispy.
Second attempt: Skipped the wire rack and used paper towels. The bottoms steamed themselves, sad and limp, within 5 minutes.
Third attempt: Got distracted by my phone and let the oil hit 380°F. The panko turned dark brown and bitter in about 45 seconds. The chicken inside was still slightly undercooked. Burnt on the outside, raw in the middle. Classic.
Fourth attempt: Forgot to pat the chicken dry after the baking soda rinse. The egg wash slid right off. Bare patches everywhere. Not cute.
Fifth attempt? Finally got it right. So follow the steps, and you’ll skip my kitchen disasters.
Storage & Freezing
To refrigerate cooked tenders, let them cool completely on a wire rack. Store in an airtight container for 2-3 days. The coating will soften a bit—that’s normal.
To reheat: Air fryer at 375°F for 6-8 minutes. Oven at 400°F for 10 minutes. Do NOT microwave. Microwaves turn that beautiful, crispy panko into a sad, chewy mess.
To freeze uncooked tenders: Bread them completely, then arrange on a parchment-lined tray (not touching). Freeze until solid, about 2 hours. Transfer to a Ziploc bag. Fry straight from frozen—add 1-2 minutes to the cook time—no need to thaw.
To freeze cooked tenders: Cool completely, freeze on a tray, then bag. Reheat from frozen in an air fryer at 375°F for 10-12 minutes.
Variations to Try
Once you’ve mastered the basic panko chicken tenders recipe, mix it up:
- Spicy tenders: Add 1/2 tsp cayenne and 1 tsp smoked paprika to the salt you sprinkle after frying. Or mix chili powder into the panko.
- Garlic parmesan: Add 1/4 cup grated parmesan cheese and 1 tsp garlic powder to the second panko plate. Sprinkle with fresh parsley after frying.
- Lemon pepper: Toss the finished tenders with lemon zest, black pepper, and a pinch of salt.
- Gluten-free: Use gluten-free panko (yes, it exists) and everything else stays the same.
(Reader tip: Make a double batch of the breaded, uncooked tenders and freeze half. Then on a busy weeknight, you’re 8 minutes away from crispy tenders. Future you will be very grateful.)
How to Serve Panko Chicken Tenders
- Classic tender basket: Fries or onion rings, coleslaw, and a few dipping sauces.
- Chicken tender salad: Chop them up over romaine, tomatoes, cucumber, and ranch or honey mustard.
- Tender wraps: Stuff into a tortilla with lettuce, tomato, avocado, and spicy mayo.
- Appetizer platter: Serve with multiple dips for parties—BBQ, ranch, honey mustard, sweet chili.
Note
If you love this Chicken Tenders recipe, I would be so grateful if you leave a 5-star 🌟 rating in the recipe card below. I love reading your comments and feedback!
Stay posted on my latest cooking recipe through social media @Instagram, Pinterest and Facebook. And also, don’t forget to tag me when you try my recipes.
Easy Homemade Crispy Chicken Tenders Recipe
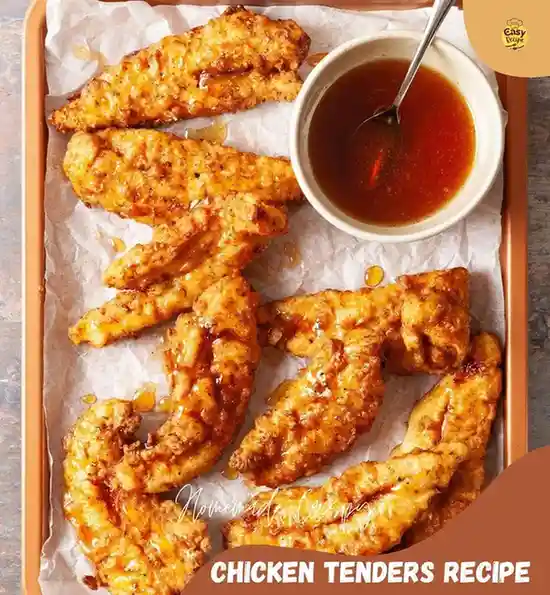
Perfect for weeknight dinners, game days, or family gatherings, these crispy chicken tenders pair beautifully with fries, coleslaw, and all your favorite dipping sauces!
Ingredients
For the Chicken
For Tenderizing
For the Coating
Optional Seasonings
For Frying & Finishing
For Dipping (Optional)
Instructions
Step 1: Tenderize the Chicken
- Place the chicken tenders in a bowl and sprinkle with baking soda. Toss well to coat evenly and let sit for 15 minutes. Rinse lightly and pat dry with paper towels.
- This simple trick helps create incredibly juicy and tender chicken.
Step 2: Prepare the Coating
- In one bowl, whisk together the eggs and cold water.
- In another bowl, combine the panko breadcrumbs with garlic powder, smoked paprika, cayenne pepper, black pepper, and salt.
Step 3: Bread the Chicken
- Dip each chicken tender into the egg mixture, then coat thoroughly in the seasoned panko breadcrumbs. Press gently so the coating sticks well.
- Place the coated tenders on a plate and let them rest for 5 minutes before frying.
Step 4: Fry Until Crispy
- Heat oil in a deep skillet or heavy-bottomed pot to 350°F.
- Carefully fry the chicken tenders in batches for about 4–5 minutes per side, or until golden brown and fully cooked.
- Transfer to a wire rack or paper towel-lined plate and immediately sprinkle with sea salt.
Step 5: Serve Hot
- Serve warm with your favorite dipping sauces like ranch, honey mustard, BBQ sauce, or sweet chili sauce.
Nutrition Facts
Servings 4
- Amount Per Serving
- Calories 450kcal
- % Daily Value *
- Total Fat 10g16%
- Sodium 420mg18%
- Total Carbohydrate 16g6%
- Dietary Fiber 1.5g6%
- Protein 30g60%
* Percent Daily Values are based on a 2,000 calorie diet. Your daily value may be higher or lower depending on your calorie needs.
Note
So, have you tried making panko chicken tenders at home before? Or are you still buying the frozen bag? Drop a comment below—tell me your favorite dipping sauce or any wild seasoning blend you’ve tried.
And if you make these, tag me. I want to see that golden, flaky, shatter-crunch panko. Just don’t forget the wire rack. 😉
Pin this recipe to share with your friends and followers.

FAQ – Panko Chicken Tenders Recipe
Can I bake or air fry these instead of deep-frying?
I have not tested air-frying this exact recipe yet. Deep frying gives you that fast, even crunch and cooks the chicken so quickly that it stays extra juicy. If you experiment with an air fryer, try 375°F for 10-12 minutes, flipping halfway, and spray generously with oil. I’ll update the post when I test it myself.
Why is my panko coating falling off?
Two culprits: your chicken wasn’t dry enough after the baking soda rinse, or you didn’t press the panko on gently but firmly. Also, make sure you’re using the double-coating method—panko, egg, panko. Skipping the first layer of panko makes the egg wash slide around.
Can I use chicken breasts instead of tenders?
Yes. Slice boneless, skinless chicken breasts into 1-inch wide strips. If they’re uneven in thickness, pound them gently with a rolling pin between two pieces of plastic wrap so they cook evenly.
How do I know when the tenders are cooked through?
At 340°F oil, 4 minutes total (2 per side) is usually perfect for tenders. Cut one open—the juices should run clear, no pink inside. Or use an instant-read thermometer: 165°F internal.

You may also like...